Code-Based Ground Motion Record Selection Using Uniform Hazard Spectra
Sep 23, 2024
Introduction
Selecting ground motion records for nonlinear time-history analysis is critical for accurate seismic design and assessment. There are several methods available—ranging from simple building code requirements to more complex hazard scenarios and mainshock-aftershock sequences. In this post, we’ll focus on Uniform Hazard Spectrum (UHS)-based selection and walk through how to select records that comply with building code requirements like Eurocode 8, ASCE 7-22, and others.
Let’s dive into Djura’s Record Selector!
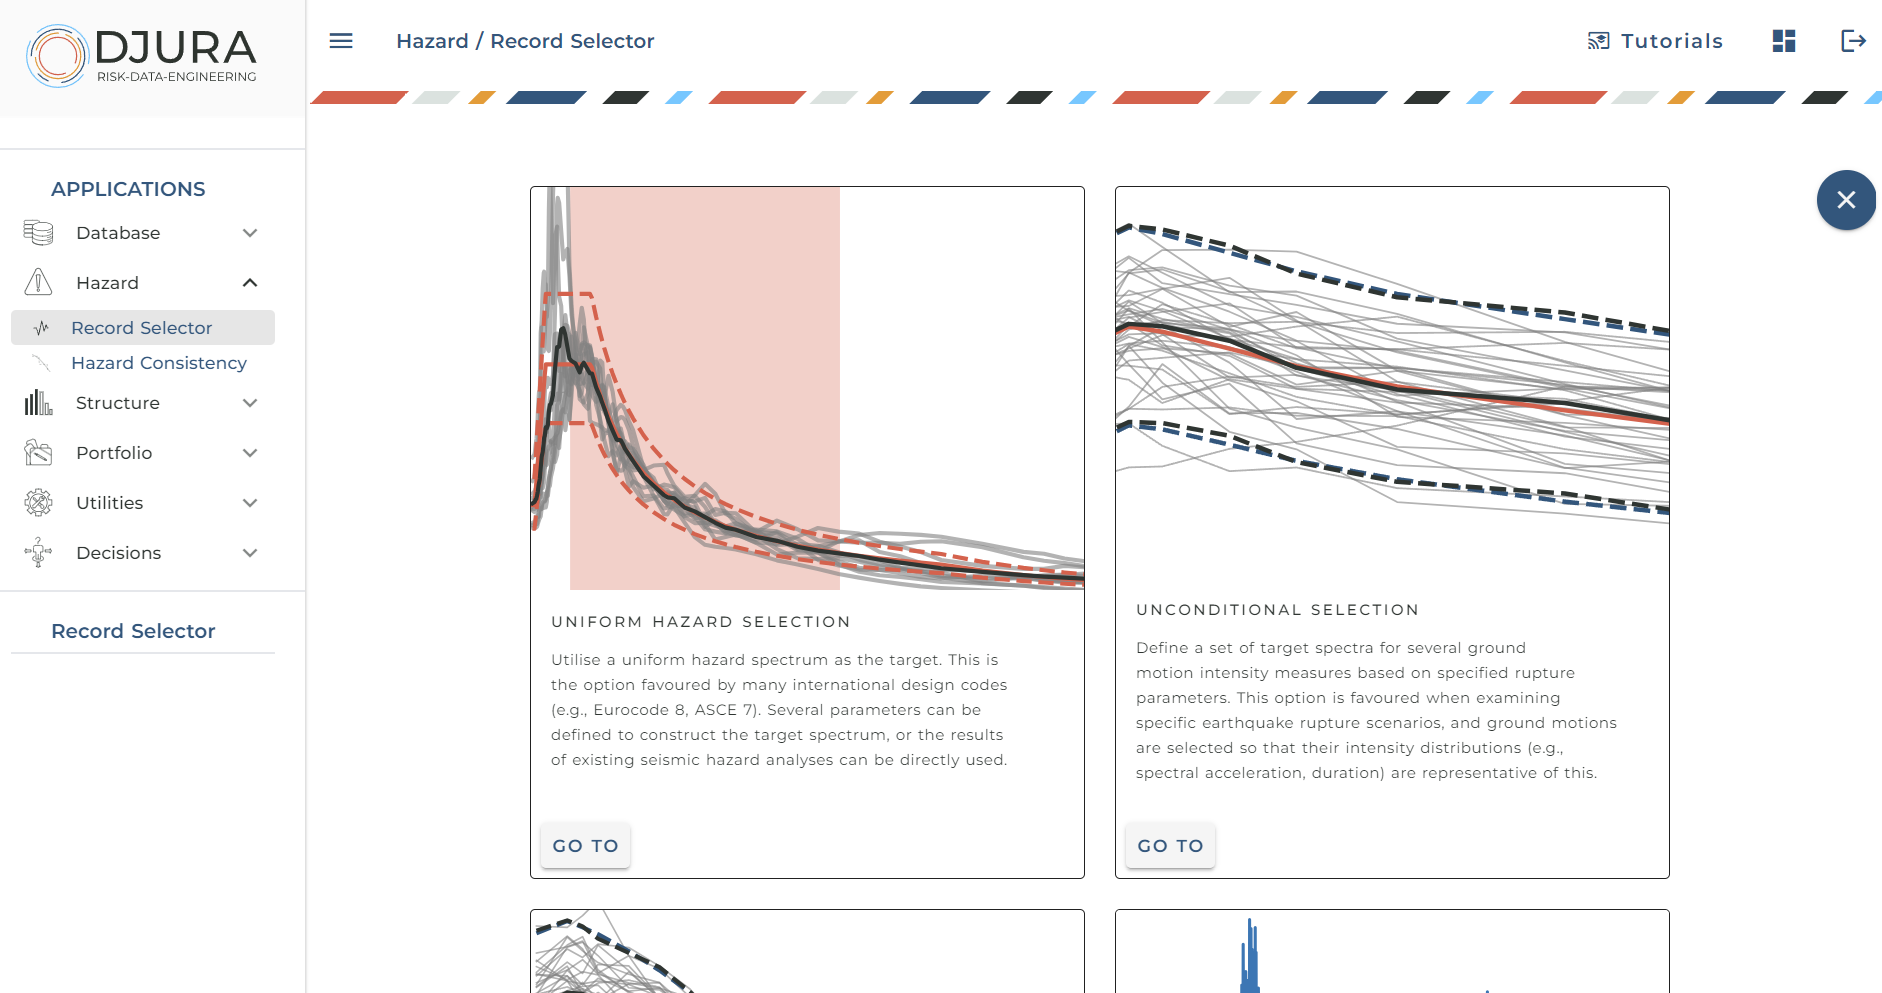
The UHS-based selection module of Djura’s record selector provides a versatile tool for selecting ground motions according to various building codes from across the globe. It includes the latest Eurocode 8 draft, ASCE 7-22, and more, with the ability to add additional codes based on user feedback.
The interface is user-friendly: on the main page, you'll find a menu to select from different building codes, and on the right, you have tools to create your target spectrum, perform the selection, or reset inputs to start over.
Defining the Target Response Spectrum
1. Define the Basic Input Parameters
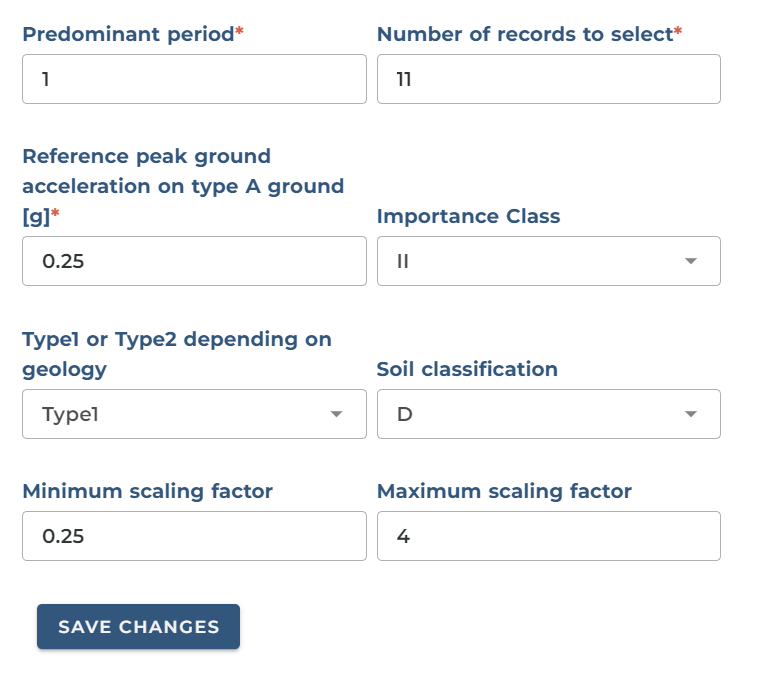
The first step in selecting ground motions is defining the target response spectrum according to the relevant building codes. Several key input parameters are common across most codes:
- Predominant Period: Typically, this corresponds to the structure’s first mode period.
- Number of records to select: This is the number of ground motions to select which is generally a user-defined choice, but several codes offer some guidance on the minimum number that should be adopted.
- Minimum/Maximum scaling factor: While this is not generally a specific requirement of some building codes, it is an important parameter that analysts often need to take care with. It describes the minimum and maximum amount of amplitude scaling that can be applied to the candidate ground motions during selection.
2. Define the Building Code-Specific Parameters
Next, you’ll input parameters specific to the building code you're following. Below are brief overviews of the parameters required by various codes:
Eurocode 8 - CEN (2004)
- Reference peak ground acceleration (PGA) on type A ground.
- Importance class.
- Type 1 or Type 2 spectrum, depending on geology.
- Soil classification.
Eurocode 8 - CEN (2024)
- Reference spectral acceleration (replacing PGA from the previous edition).
- Performance factor.
- Topography type.
- Soil classification.
- Depth of seismic bedrock ( ≥ 800 m/s).
Switzerland - SIA (2003)
- Zone (location-based).
- Soil classification.
United States - ASCE 7-22 (2022)
- Fundamental period in two principal directions.
- Soil classification.
- Mapped spectral response acceleration at short periods and 1s period.
- Long-period transition period.
- Risk category.
- Period range bounds.
Italy - NTC (2018)
- Peak ground acceleration.
- Topography type.
- Maximum spectral amplification factor.
- Soil classification.
- Limit state definition.
Türkiye - TBEC (2018)
- Earthquake ground motion intensity level.
- Spectral acceleration coefficient at short period and 1.0s period.
- Soil classification.
3. Obtain Site Hazard Information Directly from Site Coordinates
Many building codes require hazard parameters based on the seismicity of a site. In several countries, national seismic hazard models make this a lookup task for analysts.
A standout feature of Djura’s Record Selector is the ability to access seismic hazard data directly from the European Facilities for Earthquake Hazard and Risk (EFEHR) API web service. By simply entering site coordinates (longitude and latitude), you can retrieve Uniform Hazard Spectra for specific locations using models like ESHM 2013 and ESHM 2020.
This feature is also available for USGS data in the USA and Türkiye’s national hazard model, providing global functionality. It’s a powerful tool that saves analysts significant time with just a few clicks.
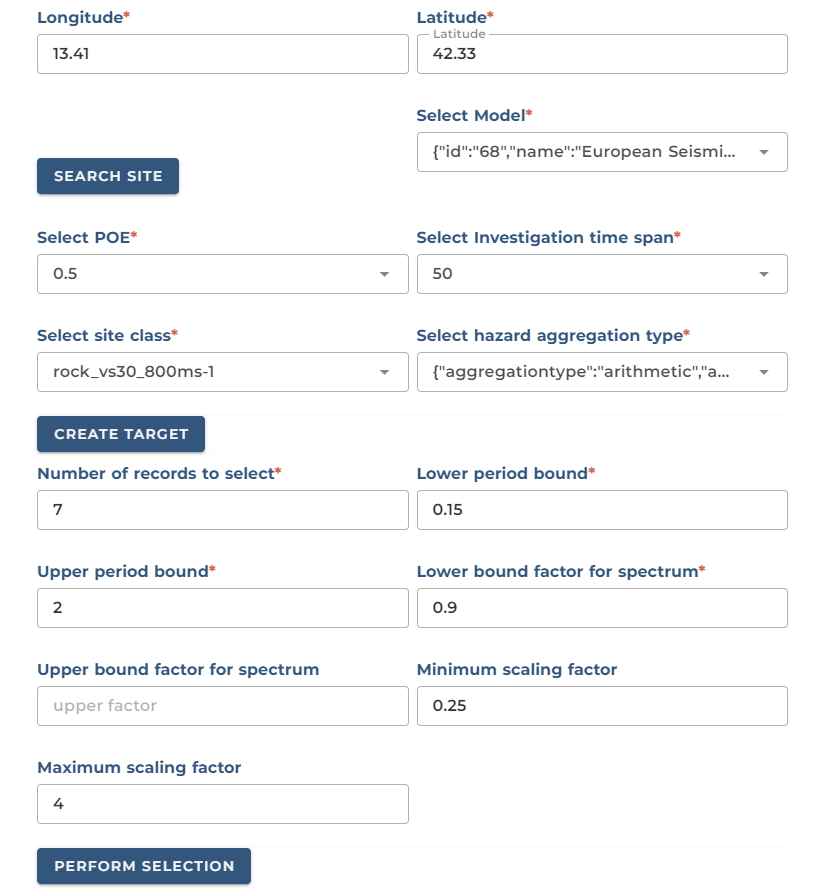
4. Creating the Target
Once all input parameters are set, click “Save Changes” and then hit “Create Target Distribution” on the right to generate the target response spectrum.
5. Visualizing the Target Spectrum
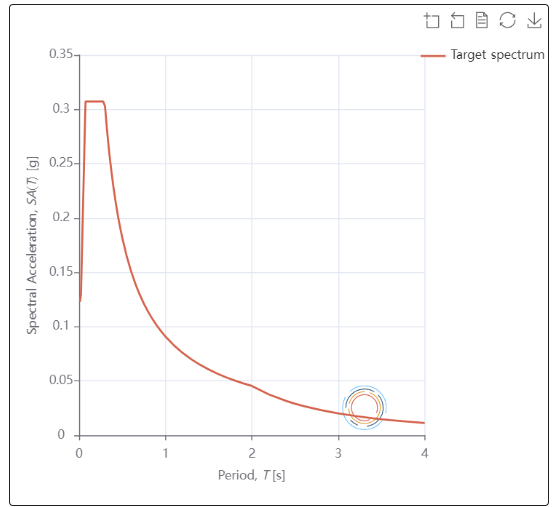
The tool displays a fully interactive plot of the target response spectrum, based on the parameters you’ve selected:
- Period of vibration on the horizontal axis and spectral acceleration on the vertical axis.
- A shaded area representing the period range of interest for ground motion selection based on code criteria.
You can hover over the plot to quickly check specific spectral acceleration values. The plot is zoomable and interactive, and the data can be saved for reports or presentations.
6. Clearing or Saving the Input Data
If you want to start over, simply click “Clear Input and Reset”. To save the target spectrum and input data, download it as a JSON file, which contains all the necessary information in a compact format.
{
  "component_definition": null,
  "num_components": 2,
  "target": {
    "SA": [
      // List[float]
    ],
    "periods": [
      // List[float]
    ]
  }
}
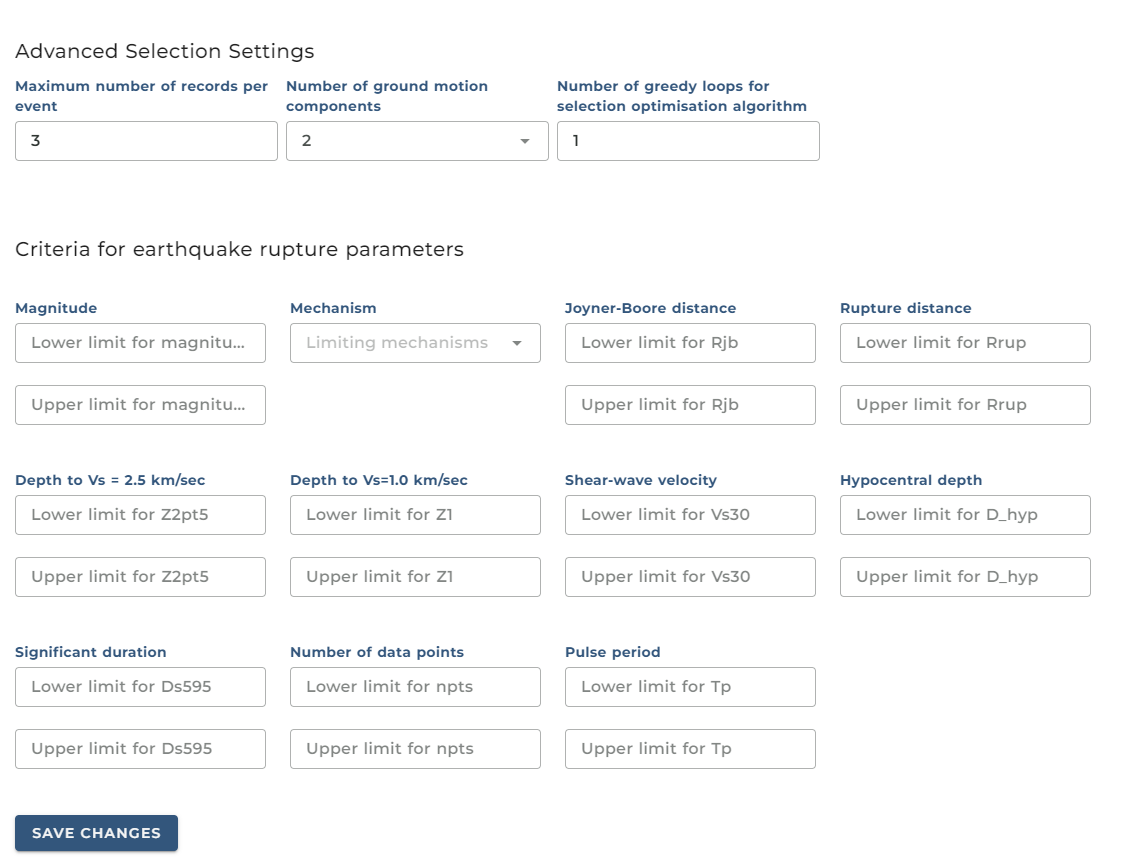
Advanced Input Parameters in Ground Motion Selection
Advanced input parameters offer additional control over ground motion selection. These options allow users to fine-tune the process for specific requirements.
1. Limit the Number of Records from a Single Earthquake
One of the advanced parameters allows users to limit how many records are selected from a single earthquake event. This can prevent the selection from being dominated by ground motions from a single earthquake, ensuring a more diverse set of data.
To adjust this, click into the advanced input settings and modify the number of records allowed per event.
2. Select Orientation for Ground Motion Components
Another key parameter is related to the number of ground motion components used in the selection. You can choose:
- 1 Component: Only a single ground motion direction is used.
- 2 Components: The selection will be based on the geometric mean of the two components, and the selected records are provided as a scaled pair.
Certain building codes may require other orientations, such as maximum component, RotD100, or RotD50, which can also be implemented if needed.
3. Optimisation Loops and Scaling Factors
To further refine the selection, users can specify:
- The number of optimisation loops: This controls how many iterations are performed to find the best match and minimise fitting errors.
- Scaling factors: These determine how much amplitude scaling can be applied to the ground motions. Tightening these limits can be useful when unscaled ground motions are required.
4. Apply Rupture Parameter Limits
Another advanced input parameter allows users to apply specific limits to the rupture characteristics of the selected ground motions. For instance, you may want to:
- Limit the magnitude of the ground motion records.
- Refine the selection to a specific faulting style.
- Among others
These settings help tailor the ground motion selection to match the characteristics of the earthquake scenario being analyzed.
5. Reduce the Length of Ground Motions
A great feature for enhancing computational efficiency is the ability to select ground motions with fewer data points. This reduces the computational time needed for numerical models.
Although not yet implemented here, another future option is to trim records by removing unnecessary zero padding before and after the main shaking event.
By using these advanced input parameters, users can fine-tune the ground motion selection process to meet the specific needs of their projects, ensuring both precision and efficiency.
Performing Ground Motion Record Selection
Once we’ve configured the optional advanced selection parameters, we can proceed to perform the ground motion record selection. Here’s how the process works.
1. Perform the Selection
After inputting all of our parameters, click “Save Changes” to return to the target screen. Once everything is set up, we're ready to perform the selection. To do this, simply hit the selection button on the right-hand side.
You’ll instantly see the results of the record selection process, with a suitable set of records displayed.
2. View the Selected Records
In the interactive figure that appears, you’ll be able to see each individual ground motion record that was selected. The following will also be displayed:
- The average of the selected records.
- The bounds specified by the building code or any other criteria required.
This visualisation allows you to see how closely the selected records match your target, and in most cases, the fit will be almost exact within the specified range.
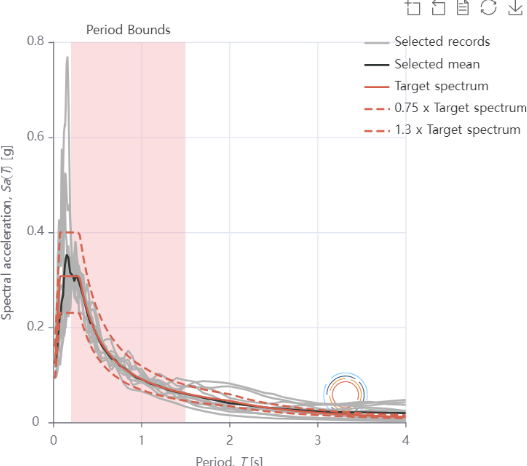
3. Modify the Plot
The figure offers a range of interactive features, such as:
- Zooming in on specific areas.
- Turning off certain layers to simplify the view.
- Visualise the tabulated data of each layer plotted.
These features make it easy to focus on the most important data. You can also save the figure to use in presentations or reports.
4. Review the Earthquake Data
Just below the figure, a new table appears, displaying the metadata of the selected ground motion records. This allows you to quickly verify that all requirements have been met and browse the details of each selected record.
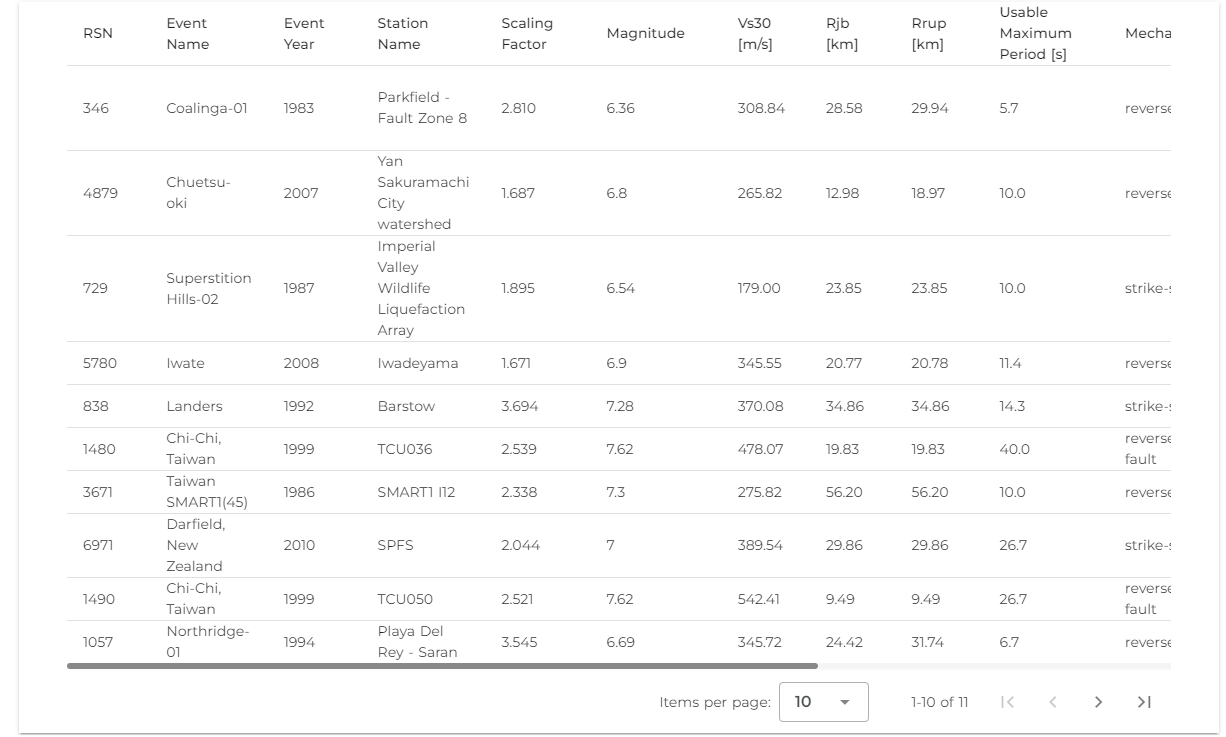
5. Download the Scaled Records
Once you’ve reviewed the selection, you can click the “Download Scaled Records” button. This will download a ZIP file containing all the information you need.
Simply click Download, open the file, and you’ll have access to the selected ground motion records, ready for use in your analysis.
Conclusion
Summary
In this guide, we demonstrated a quick and simple process for selecting ground motions based on uniform hazard spectra and various global building codes. This tool is fast and user-friendly, making it a valuable resource for engineers and analysts.
Future Updates
We are continuously enhancing the tool’s capabilities and adding features based on user feedback. Upcoming improvements include:
- Expanded ground motion databases.
- Increased interoperability with other services.
The accompanying video tutorial provides a step-by-step guide on using the UI, making record selection a breeze.
In the near future, the tool will also be callable via API for Python or MATLAB, allowing seamless integration into your workflow with a single command.
Stay Tuned
This is just one of the many ground motion selection tools we offer. Visit our website or contact us via email to learn more.
Stay tuned for more updates, videos, and tools to help streamline your seismic analysis.
References
- Shahnazaryan, D., Ozsarac, V., & O’Reilly, G. J. (2025) "Djura ground motion record selector: a software solution for earthquake engineering" COMPDYN 2025
- CEN (2004). Eurocode 8: Design of Structures for Earthquake Resistance - Part 1: General Rules, Seismic Actions and Rules for Buildings (EN 1998-1:2004) (Comité Européen de Normalisation).
- CEN (2024). Design of Structures for Earthquake Resistance (Draft) - Part 1-1: General Rules, Seismic Actions and Rules (EN 1998-1-1:2024) (Comité Européen de Normalisation).
- SIA (2003). Swiss Building Code. Swiss Society of Engineers and Architects. Zurich, Switzerland.
- ASCE 7-22 (2022). Minimum Design Loads And Associated Criteria For Buildings. American Society of Civil Engineers. Reston, Virginia.
- NTC (2018). Norme Tecniche Per Le Costruzioni. Rome, Italy.
- TBEC (2018). Turkish Building Earthquake Code. Ankara, Türkiye. Retrieved from here.
- Woessner, J., Danciu L., D. Giardini and the SHARE consortium (2015), The 2013 European Seismic Hazard Model: key components and results, Bull. Earthq. Eng., doi:10.1007/s10518-015-9795-1.